build.bvmcontracting.com

Author: wpx_bvmadmin

  • Tool and Equipment Rental Options in Ontario

    Tool and Equipment Rental Options in Ontario

    Tool and Equipment Rental Options in Ontario

    One of the key barriers to entry for a homeowner completing their own DIY renovation project is the lack of tools available to them. Many times it takes a variety of tools to complete even the most straight-forward of projects, and along with the material investment to complete the work, adding tools to the list of expenses is a hard pill to swallow. Especially for projects that require specific tools, it does not make sense to buy the tools outright to use them only once or twice.

    This is where tool and equipment rentals come in! Learn about the different rental options you have as a homeowner or real estate investor to help complete your own small renovation projects

    Option 1: For Small/Large Tool and large Equipment Rentals – THE Home Depot

    Having used their tool and equipment rental many times we can vouch for the ease of use and variety of options they have for tool and equipment rentals. You can rent anything from a tile cutter all the way to skid steers, and they charge you based on a minimum 4 hours of use and have options all the way up to 4 weeks.

    We recommend that people who already have the base tools (hammer, drill, screw drivers, saw, etc.) but are in need of 1-2 specialty tools for their project use The Home Depot Rental Service. If you end up renting a lot of items from them it will get pretty costly so make sure you have a game plan and budget.

    If you are utilizing The Home Depot Project Loan for your renovation project you will be able to utilize their rental service and apply charges from rentals to the project loan!

    If you find a tool or piece of equipment on The Home Depot (THD) Website that you want to rent, it is recommended to call your local THD rental desk to confirm availability and book the rental! You can find the pricing directly on their website for most tools and equipment. If you live in a large City like Toronto that has multiple locations, you can try reaching out to multiple stores to find the tool or piece of equipment you need!

    Option 2: For Larger Tools and Heavy Equipment – Battlefield Equipment Rentals

    For more industrial equipment/machines and large tools Battlefield might be the best place to look. With 35 locations across Ontario they service the larger metropolitan areas of the Province. BVM Contracting has used Battlefield pretty extensively over the last few years for our construction heating and large tool rental needs.

    Since none of their rental pricing is available online, you will need to reach out to your local dealer to determine what the availability and pricing will be for the rental you would like. Much in the same way as The Home Depot’s rental service, you will only want to rent the specialty items that you need for one-off/less frequent projects, if you end up needing a piece of equipment longer term you should explore the option of buying versus renting, depending on what the tool or piece of equipment is and how frequently you will use it.

    Option 3: Renting common renovation tools from your local tool library

    Tool Library’s in Ontario are available in many of the larger City’s and areas of the province. These tool library’s are non-profits that have an inventory of regularly-used tools that homeowners can rent for their personal home renovation projects.

    For example, Toronto’s Tool Library offers annual memberships that range from $55-$110 + HST per year and allow you different rental options, date ranges, and reduced fees on more specialty (or higher demand) tools.

    To find your local Tool Library (or to see if your area has one) you can check out this map that shows an up-to-date version of where they are located in Ontario. Plus, you are supporting a great local non-profit that is giving back to your community!

    Option 4: Borrow Friends and Family’s Tools

    One of the most common and cost-effective methods to get tools is to borrow from friends and family. Many times there is a friend or family member with a large tool catalogue that may be willing to give you some basic tools for your project.

    What if I have no experience using tools?

    Operating tools (specifically power tools) comes with associated risks, and if you are new to operating them you will want to proceed with caution. There is no shortage of online information on how to safely operate and use tools, and if you have more experienced friends or family members that can give you a crash course in how to operate certain tools take them up on it. The last thing you want to do is hurt yourself, so make sure you feel comfortable wielding the tools you will need to use for your project!

    When to buy versus own a tool or piece of equipment?

    The questions you need to ask yourself before deciding which way to proceed are:

    • How many times am I going to use said tool?

    • How much does it cost to rent said tool per time?

    • How much does it cost to buy said tool?

    Once you have this information the math is simple, if the number of times multiplied by the cost to rent per time is larger than buying the tool, you should just buy the tool. If you are unclear on how many times you will need to use the tool then renting will probably be the best option.

    Reach out to us with any additional questions or inquiries you have!

    Please reach out to us or leave a comment below if you have any specific questions!

    About BVM COntracting

    BVM Contracting is a full-service General Contractor or Home Builder located in Toronto. We provide home renovation and building services for major home renovations (kitchen renovations, bathroom renovations, basement renovations, full interior renovations, home additions, lot severances, and new home construction). Our goal is to help guide our clients through the process of renovating their home, from concept to completion.

    Further than providing General Contracting and Project Management for major home renovations, we also offer value-added services such as renovation financing, renovation rebate consultations and services, building permit and design services, smart home installation services, and real estate investor services.

    To learn more about our offering by visiting our services page.

  • Temporary Power – Everything You Need to Know

    Temporary Power – Everything You Need to Know

    Temporary Power for Home Addition or Home Building Project

    Learn more about when temporary power is needed and what your options are

    One of the lesser thought about aspects of home additions or custom home builds in Toronto is how to get power for the duration of the project. Depending on the type of project you are completing you may or may not need temporary power, and there are different types of temporary power to chose from that all have varying levels of cost. This article helps homeowners understand the when and which of temporary power so you can plan accordingly and help your project start with no hiccups!

    When is temporary power needed for a residential construction project in toronto?

    The following four scenarios outline the times when temporary power is needed:

    1. New Home Builds and Custom Home Builds (otherwise known as residential infill construction). Whether you have overhead or underground service your power will be disconnected from your home and you will be forced to use one of three methods outlined below.

    2. Second or Third Level Home Additions with Overhead Power. If you have overhead service that goes through your roof down into your basement and are completing a top-up to your existing bungalow or two-storey home you will need to order a disconnect with Toronto Hydro and will have to use temporary power for the duration of the project.

    3. Home extensions where underground power is encroaching location of new extension. If you have underground electrical service but your proposed extension to your property is proposed in the path of the service, the service will need to be disconnected. You may also potentially have to get the service re-routed to allow for the power to be reconnected.

    4. Home extensions where over head wiring encroaches the newly proposed extension. There is a certain amount of clearance that is needed away from overhead wires, and if Toronto Hydro determines that your new home extension will encroach the minimum clearance they will disconnect your power.

    What options do I have for temporary power during my residential construction project?

    1. Neighbours. This is easily the most cost-effective method to get temporary power, as long as you have a good rapport with your neighbours and they have an outlet accessible for the duration of the project. We’ve had many clients successfully do this and pay for the neighbours hydro for the amount of time that it is used during the construction project. It still beats the next two options by a landslide in cost.

    2. Generators + Fuel Charges. If neighbouring power is not an option, and you don’t want to pay for a temporary hydro connection (see below), generators will be the only viable option. Note that generators are not quiet and are likely to cause quite a bit of noise during the day, which may be a way to convince your neighbours to use their power! The average cost for a 6-8 months project in fuel and generator costs will be between $2000-$3000.

    3. Temporary Hydro Connection + Temporary Hydro Pole. This is by far the most costly option, but is sometimes the only option for new home builds or home additions. There is a cost associated with A) Obtaining a Hydro Pole, which needs to be a certain height and diameter of wood, B) Paying Toronto Hydro for the connection/disconnection fees, and C) Paying our Electrician to do the connections with a temporary panel and outdoor receptacles. This method can easily cost between $5000-$6000, but is sometimes necessary. As long as it is accounted for in the total project costs then everyone should be happy!

    When Can Power be reconnected to a Home Addition or New Home Building Project?

    The earliest that power can be reconnected is when the ENTIRE exterior is finished, including aluminum, windows, and all exterior finishes, irrespective of if they are close to the location of the hydro meter. This is why it is important to work with an efficient Home Builder in Toronto to ensure that you can get to a permanent hydro connection sooner in the project.

    ConclusioN

    We firmly believe that accounting for everything in the scope of work is the best way to conduct business as a home builder and General Contractor in the GTA. If you are completing a new home build or home addition project in Toronto, make sure that you account for any potential temporary hydro costs!

    About BVM COntracting

    BVM Contracting is a full-service General Contractor or Home Builder located in Toronto. We provide home renovation and building services for major home renovations (kitchen renovations, bathroom renovations, basement renovations, full interior renovations, home additions, lot severances, and new home construction). Our goal is to help guide our clients through the process of renovating their home, from concept to completion.

    Further than providing General Contracting and Project Management for major home renovations, we also offer value-added services such as renovation financing, renovation rebate consultations and services, building permit and design services, smart home installation services, and real estate investor services.

    To learn more about our offering by visiting our services page.

  • A Guide to Home Renovation and Home Building Contracts

    A Guide to Home Renovation and Home Building Contracts

    A Guide to Residential Construction Contracts

    Make sure that you take your time in reviewing renovation or home building contracts, they will make or break your experience

    The level of detail and thoroughness in a General Contractor’s contract will tell you a lot about the company you are planning to work with for your renovation, home addition, or custom home building project. For us, it is something that we allow our potential customer’s to look at very early on in the process because we believe that it is an advantage to show it and put all of our cards on the table. With the amount of money that homeowners and investors are spending on their home renovations and home building projects in Toronto it is the least we can do to give them some transparency.

    Having created custom construction contract with our lawyer and understanding the potential risks for both the General Contractor and Homeowner, we have compiled a list of must-have terms and conditions that you will want to see in a resdiential construction contract before signing up.

    CCDC and CuSTOM CONSTRUCTION Contracts

    It is important to comment that residential construction is not bound to CCDC contract terms and conditions if the contract that a General Contractor uses is custom to their business operations, therefore it is up to you to figure out with each of the General Contractors you are working with at the quoting stage to see what contract format they use and how that may work with your project. Every General Contractor has a different way that they approach contracts so make sure you ask about it as soon as it makes sense in the pre-construction process.

    With BVM Contracting, we have a custom contract that stipulates a fixed price amount (because we fully procure our projects before our clients sign our contract) with adjustments to the contract based on commodity increases and decreases. Some other General Contractors offer other types of contracts but we have found that the one that we use works for homeowners and real estate investors alike to help accurately budget and make sure they can afford the work.

    Key Terms and Conditions for Residential Construction Contracts

    Independant Legal Advice – An Absolute Must

    As a homeowner you will want to have the ability to get independent legal advice (otherside known as ILA) for the contract(s) you are reviewing. This will allow you to ensure fairness in the contract terms and make sure that everything is included that should be. Your lawyer will be able to tell you which contract is the best so don’t be afraid to ask their opinion. At the end of the day a contract should protect both parties so make sure that the ones that you are reviewing do just that.

    Holdback

    To make sure that a scope of work is fully executed there is a condition for a certain amount of money to be held back until the contract is fulfilled. This amount will vary depending on the size and type of project but expect this to be in the range of 5 to 10 percent.

    Warranty Information

    The contract is usually the area that outlines what is included and the validity period of the warranty from a renovation contractor or home builder. Make sure that the contract includes this and is something you are comfortable with. Usually we recommend that our clients speak with our past clients that we refer them to and ask about how the warranty period went and how we responded to warranty-eligible items. It is important to verify this as things always pop up and it will be important to have a team that will respond quickly versus one that will disappear after you give them the final cheque.

    Clear Payment Terms

    Make sure that if the renovation or home building contract outlines the way the payments will be made, along with the options of how the payments can be accepted. With such large amounts it is usually direct transfer or cheques that work best. You should be looking for signs that the payments will be made in draws that match the amounts shown in the budget (which should be an budget itemized, just so you are aware!).

    Clear Terms on Communication Procedure

    This is probably not discussed at all by General Contractors but is nonetheless very important. Having a single representative on the homeowner and Contractor side is super important to making sure that information and discussions are accounted for and acted upon. As cumbersome as it is to have everything documented via email, it is an important step in ensuring that both parties are protected should any disputes come up.

    Dispute Resolution Terms

    Obviously a last resort but this is an absolute must to have in any contract. There are so many ways that a renovation or home building project could go, if you are working with a reputable General Contractor this won’t need to be used but it will outline the steps in the event that something goes wrong.

    Definitions Section

    Since legal contracts sometimes cannot explain every word that is being reused, there is usually a section that provides the definition for each regularly used term. Make sure you understand and review the definitions of these words to ensure there are no gaps in your understanding of any of the terms and conditions.

    Change Order Process

    Make sure you understand the process of how change orders will be documented and completed during the project, there should be a term that outlines this.

    Insurance Information

    Ensure that the insurance information for your General Contractor, usually it outlines it but they should be able to provide it upon request.

    Default Conditions

    In the event that either party defaults on their contract obligations it is important to understand the mechanism in which the default can be created and what the other party is entitled to.

    Other important considerations when reviewing a residential construction contract

    While you are reviewing the contract you should also review the following items:

    • References for past projects. Preferrably you will want at least 1 reference from a similar project completed along with another 2 references from recently completed projects. Make sure that you ask them about warranty and other potential issues that came up and how the General Contractor dealt with them.

    • WSIB, Insurance, and Business License. They should be available upon request.

    • You should ask for a draft draw schedule (for payments) that outlines what the first 3-6 draws are going to look like, with estimates of draws amounts and timing after that.

    Conclusion

    Once you obtain legal advice, review the additional items above, and have confirmed that all of the items above are included you should be in good shape to make an educated decision about which General Contractor to move forward with for your home renovation or custom home build. It is important to have a checkpoint at this stage and take the time to review properly, it is a lot of money on the line so make sure you are choosing a Contractor that will protect you during the project.

    About BVM COntracting

    BVM Contracting is a full-service General Contractor or Home Builder located in Toronto. We provide home renovation and building services for major home renovations (kitchen renovations, bathroom renovations, basement renovations, full interior renovations, home additions, lot severances, and new home construction). Our goal is to help guide our clients through the process of renovating their home, from concept to completion.

    Further than providing General Contracting and Project Management for major home renovations, we also offer value-added services such as renovation financing, renovation rebate consultations and services, building permit and design services, smart home installation services, and real estate investor services.

    To learn more about our offering by visiting our services page.

  • Procurement-Based Renovation and Home Building Budgets

    Procurement-Based Renovation and Home Building Budgets

    Learn More About Our Procurement-Based Budgeting Process

    At BVM Contracting we understand that home renovation, custom home building, and home addition projects are expensive and require a lot of capital to complete. Many times when you are working with General Contractors in Toronto, they will help you estimate the cost of your project but won’t go so far as to finalize everything with their preferred list of vendors and subcontractors before a contract is signed. This leads to underestimations and unmet expectations about total project costs.

    As a Family-run General Contractor in Toronto, the last thing we want is to start a project that cannot be finished. This does not benefit our clients and does not lead to a good reputation in the industry. In the sections below we outline our budgeting process and how we take the extra steps needed BEFORE any contracts are signed to give our clients the peace of mind to work with us and complete their project on time and on budget.

    What is procurement-based budgeting?

    Procurement-based budgeting is a term that we use to describe how we finalize our renovation or custom home building budgets. It is a multi-step process that includes:

    1. Developing a detailed scope of work from working drawings that describes the construction work that will be completed. This is an itemized description of our activities to complete a project from beginning to end (or beginning to whenever a client takes over). This requires the client to have a set of designs/drawings that outline the work to be completed.

    2. Coordinating a site visit to the project site (mostly for renovation and home addition projects, new home construction projects don’t need site visits most times unless there are environmental factors (ravine protection, tree protection, shoring) that may be needed)

    3. Working with our subcontractors and vendors to finalize selections within the scope of work to get our clients the most accurate budget with finalized quotes from all of our subcontractors and vendors. This requires some legwork from our clients to decide on certain selections for a project (i.e. plumbing fixtures, doors selections, flooring, etc.) but pays off in the end with a finalized budget with a representative cost. Even if the selections are changed as the project moves along, at least the pricing is based on something instead of nothing.

    Our goal with every project we budget is to have as many of the line items with what we call “confirmed pricing” before signing any contract. We do this so we can show you our capabilities as a General Contractor and to also ensure that we can reduce the amount of extras and change orders needed throughout the course of the residential construction project. Whether it is a $200 000 renovation or a 1.6 million dollar custom home build, the same process applies and leads to a lot of happy clients.

    Conclusion

    Although our final budgets will take longer to put together and will likely cost more than other General Contractors in Toronto, at least you will know that it is representative to the total cost of the project, and will know exactly what you are getting. We take a lot of pride in our reputation as a Custom Home Builder and Home Renovation company in Toronto, so we would rather lose out on work because it is accurate than win work because the pricing is not finalized.

    About BVM COntracting

    BVM Contracting is a full-service General Contractor or Home Builder located in Toronto. We provide home renovation and building services for major home renovations (kitchen renovations, bathroom renovations, basement renovations, full interior renovations, home additions, lot severances, and new home construction). Our goal is to help guide our clients through the process of renovating their home, from concept to completion.

    Further than providing General Contracting and Project Management for major home renovations, we also offer value-added services such as renovation financing, renovation rebate consultations and services, building permit and design services, smart home installation services, and real estate investor services.

    To learn more about our offering by visiting our services page.
  • Toronto Home Building Glossary

    Toronto Home Building Glossary

    Learn about all of the different words, terms, and phrases that you will inevitably hear (or will want to know) when planning to renovate, add onto, or build a new home in Toronto

    This article is an “ongoing” blog that we will add to as we keep talking to more and more home owners and real estate investors that are looking to understand the residential construction process better.

    Home Building Glossary (A-Z)

    As-Built Drawings (substantial Renovations)

    As-built drawings are important for substantial renovation projects by providing a designer or architect a set of drawings that outline the dimensions of the existing house being altered. This is usually the first step in the design process, a person usually has to come to the property to measure the interior of the house (all levels) as well as the exterior of the house if there are alterations being made to the interior. These drawings, along with either a survey of the property, gives your designer or architect the ability to start designing the alterations to the existing structure and figuring out how to best optimize the new space.

    Note that as-built drawings are not needed for infill construction projects, only projects where the existing structure is being reused in anyway.

    As-Built Surveyor’s Real Property Report (Infill Construction)

    An as-built plan of survey is needed to verify compliance with the permit drawings for infill construction projects, including laneway and garden suites. The Toronto building inspector overseeing the project needs to be sure the new structure is at appropriate setbacks from property lines and that the elevations are correct. An as-built SRPR helps to identify possible issues before it is too late or too costly to correct them. This is needed for the project to progress in the City of Toronto, as the building inspector will ask for it in order to sign off on the framing phase.

    Cantilevered Overhangs (Structural Design)

    A cantilevered overhang is a structural method of extending usable floor space over load bearing walls or beams. This is popularly completed in Toronto with second level additions to unlock more space for bedrooms while adding a bit of protected space beneath. Note that due to the floor space being above the outdoor elements there is a requirement to insulate the floor. We recommend sprayfoaming to prevent as much heat transfer as possible. Due to that area of the floor being over unconditioned space you will likely feel a slight difference in temperature on the floors as well.

    To see one of our finished projects that utilized cantilevered structural design, please visit our Chilton Avenue Home Addition Page Here!

    Combination Boiler (or Combi Boiler)

    A combination boiler is installed in houses to provide domestic hot water for plumbing fixtures (showers, faucets, dishwashers, washing machines, etc.) but can also be used to provide heat to air handlers and for radiant heating (baseboard radiators, in floor heating, etc.). These are basically tankless hot water heaters that have a high enough BTU output to also provide heating if needed.

    Committee of Adjustment (C of A)

    Committee of Adjustment is a process designed by the Toronto Building Department and Toronto Planning Departments to keep track of all variances requested from home owners and properties that are looking to build/renovate. Depending on what variances you are trying to get you will have a higher likelihood of approval from C of A. The ability for C of A to approve certain variances depends on many factors including (but not limited to) historically approved variances in your neighbourhood (think of them as precedents), neighbour feedback/support, and the experience of the person representing your project in front of C of A (how much experience your designer/planner has with C of A is important).

    Footing Size Verification (Home Additions only)

    The process of footing size verification involves digging down below the existing home’s footings to determine the soil conditions, width, and depth of the footing to understand if the existing footings/soil can support the load of additional levels to the home. It is recommended to get this work done during the design phase, and some architects/designers offer this as a service during the design phase. If they do not we can offer this as part of our building scope for a fee. The verification includes a report from a structural engineer verifying that the soil conditions and footings are sufficient to carry the additional load of the new levels of the house. This report is submitted to the City for review during the permit submission process.

    Garden Suite

    A garden suite is a self-contained secondary dwelling unit located on an already establish property in Toronto. A garden suite must adhere to the zoning bylaws that have been established by the City of Toronto. The major difference between a garden suite and laneway suite is the former does not need to abut against a laneway in order to be built. A garden suite is considered a residential infill construction project.

    Heat Pump (HVAC EQUIPMENT)

    A heat pump is defined as a system that transfers heat from or to an outdoor condenser through the use of refrigerant and electricity. Heat Pumps operate very similarly to Air Conditioning units in the Summer but the key difference is the heat transfer process can be reversed to also provide heating during the winter months. There are now Heat Pump systems that can be used to heat and cool homes in Toronto all year round with little to no ancillary/back-up heating required.

    Heat pumps can either be connected to ducted or ductless systems to distribute heating and cooling throughout a home.

    Home Addition

    A home addition is defined as an addition to your already-established home. This may include an extension to the sides, rear, or front of the house or may also include additional levels to the home (i.e. turning a bungalow into a two-storey home). Due to the great soil conditions and well-built homes in Toronto, many war-time bungalows and houses built with double-brick masonry are easily converted into 2 or 3 level homes. As long as 51% of the existing exterior walls are maintained from the original home you can submit your building permit to The City of Toronto classified as a Substantial Renovation (SR) instead of a New Home Build.

    Infill Construction (residential)

    Infill Construction is defined as the removal of the entire existing home (including foundation/footings/drains) to create a completely new home. There are even more steps/considerations to be followed with this including (but not limited to) infill construction notices that are sent to the neighbours surrounding the impending build, upgrades to the sewers and water supply lines on both the private side and city side of the property, and additional costs incurred by building a completely new home when compared to home additions or substantial renovations. Examples of types of projects considered infill construction are custom homes, laneway suites, and garden suites.

    Laneway Suite

    A laneway suite is a secondary, self-contained dwelling unit abutting a laneway that can now be built in the City of Toronto. This creates a new building on an already-established property where access to the unit is from the laneway. Laneway suites have their own set of zoning bylaws that must be adhered to, much like renovations and building projects to primary dwellings. All properties in Toronto (including Scarborough) that qualify from a zoning standpoint for this program can apply.

    New Home Construction

    A New Home Construction project is classified by the removal of more than 51% of the existing walls and is shown on building permits as New Home (NH) instead of Substantial Renovation (SR). Note that Infill Construction is classified as New Home Construction. It is important to be aware of the additional costs that will be incurred by submitting your project as a New Home project. BVM Contracting can help you through this process, having a wide range of experience dealing with New Home Construction projects in Toronto.

    Permit Submission Package

    A permit submission package is the final version of the design package that the City of Toronto reviews and provides Ontario Building Code-related feedback and approves the plans for permit. The additional layer of drawings provided at this stage are the structural drawings for the home, whether it is new or an existing structure. Usually this is the stage where you can submit the drawings to builders for a more formal review and to get finalized pricing. Note that along with the building permit there may also be a demolition and plumbing permit if you are demolishing the existing home (for new home’s) and/or revising the plumbing (i.e. moving, or adding fixtures).

    *NOTE THAT FOR ANY NEW HOME AND SUBSTANTIAL RENOVATION PROJECTS THAT ARE COMPLETING A HOME ADDITION, THERE IS A REQUIREMENT TO COMPLETE A NEW HVAC DESIGN FOR THE HOME. THE HVAC DESIGN AND PERMIT ARE A SEPARATE PERMIT ALTOGETHR AND DOESN’T NEED TO BE SUBMITTED WITH THE MAIN PERMIT.

    Take-offs

    TJI Joists and Joists

    Manufactured by Weyerhaeuser, TJI joists are the new standard in joist installations for new home construction and home addition projects. Made with OSB and dimensional lumber, you can create long spans for joists which gives designers the extra flexibility to bring home owner’s dreams to life. TJI’s also make the installation process easy for framers and rough-in work easier for HVAC/plumbing work. You will usually see TJI’s spec’d in your drawings once the permit submission drawings are prepared with the structural drawings.

    For those of you who are unfamiliar with what a joist is, they are a form of engineered or dimensional lumber that you use to create a floor system, along with floor sheathing (i.e. plywood or Oriented Strand Board (OSB)). There are maximum spans that certain types/sizes of joists can make. If joists are not able to span a certain length of space that is where structural beams like LVL’s or steel beams come in!

    Topographic Survey

    A topographic survey is a necessary set of drawings completed by a register land surveyor for all infill construction projects and some home addition projects (especially ones where there will be maximum height issues with zoning). This type of survey allows designer and architects to determine the established grade of the new home that is being designed, which allows them to maximize building heights for the project.

    Toronto Local Appeal Body (TLAB)

    Created through the City of Toronto Act and became effective in May 2017 to establish a second level of oversight for Committee of Adjustment applications submitted to the City of Toronto. TLAB is comprised of citizens elected by City of Toronto Council that hear appeals of Committee of Adjustment decisions. The aim of this organization is to provide efficient scheduling of hearings that are fact based, consistent, and fair for the appealing party. Note that when the decision from Committee of Adjustment is rendered there is only a certain amount of time to file an appeal with TLAB, and you will be required to pay an additional fee for the hearing.

    Walk-out (Basement)

    A walk-out is a term to describe an entrance/exit from a below-grade level of a home to the grade of the property. They are commonly used for basement secondary suites (i.e. legal basement apartments). This type of system is usually characterized as a set of concrete steps and landing from a basement to the grade of the property. The cost to do this work depends on if it is a new construction project or if it is an existing home. If it is an existing home there is underpinning work that is required in order to complete the walk-out, and engineering is involved to confirm the underpinning was done correctly.

    Zoning By-law

    Zoning By-laws are a set of parameters that are publicly disclosed by the City of Toronto that show what you can and cannot build on the property, and gives a set of rules regarding the amount of space/density a building can have on a property and where it can be located on the property. Residential zoning by-laws are reviewed during the zoning review completed by the City of Toronto when you submit your proposed renovation or new home build plans to the City.

    Zoning certificate

    A zoning certificate is the formal approval of the plans for your new home or substantial renovation project through the City. This gives you the ability to submit the permit-submission package for final review and approval by the City of Toronto.

    Zoning Review

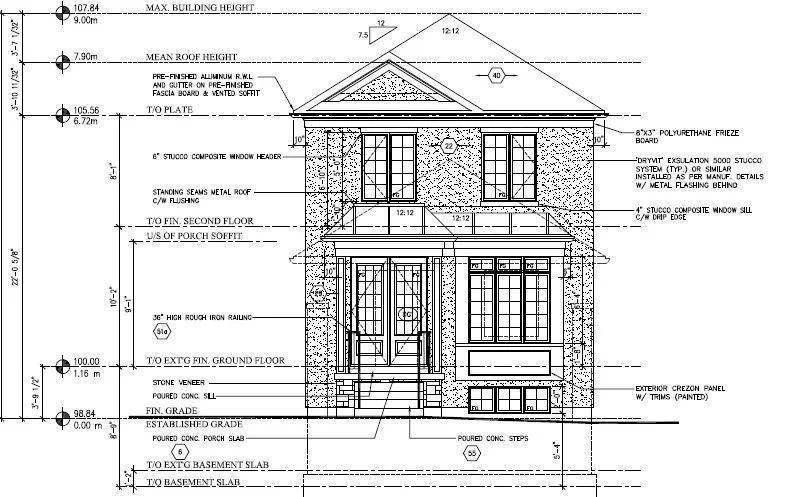
    A zoning review is completed once your designer or architect submits the design package that includes a survey, site plan, as-built drawings (if the house is to remain), floor plans for the new layout of the house for all levels (new and existing), elevation drawings, and roof plans for the City of Toronto to review. This is the step that the City of Toronto provides feedback about the project from the perspective of the zoning by-laws that are in place (Side Yard Setbacks, Front/Rear Yard Setbacks, Maximum Height, Gross Floor Area, etc.) and flags any variances that the design presents when compared to the zoning by-laws. If there are variances that are flagged the City gives your designer/architect a chance to either change the plans, or you can go to Committee of Adjustment to get the approval for the variances that they have flagged. If there are no variances then the City will provide you with a zoning certificate to proceed to permit submission.

    About BVM COntracting

    BVM Contracting is a full-service General Contractor or Home Builder located in Toronto. We provide home renovation and building services for major home renovations and custom home builds (full interior renovations, home additions, lot severances, new home construction, and laneway suites). Our goal is to help guide our clients through the process of building their home, from concept to completion.

    Further than providing General Contracting and Project Management for major home renovations, we also offer value-added services such as renovation financing, renovation rebate consultations and services, building permit and design services, smart home installation services, and real estate investor services.

    To learn more about our offering by visiting our services page.
  • How to Complete a Lot Severance in Toronto

    How to Complete a Lot Severance in Toronto

    A Guide to Completing Lot Severances in Toronto

    BVM Contracting is a home builder that specializes in new home construction and custom home building in Toronto. Over the years BVM Contracting has seen first hand what it takes to find, sever, and build new homes on existing lots in Toronto. There are many factors that need to be considered, but we have sectioned off the ideas into categories/questions below:

    1. What is A Lot Severance?

    2. Does my lot qualify to be severed?

    3. What is the process of completing a Lot severance?

      3a) Fill out this form to determine if a property is eligible

    4. For Home Owners: Take advantage of your Home’s equity and sever your lot

    A lot severance is defined as the process of dividing a property (or multiple properties next to one another) into separate and distinct new properties. For example, if you split your 100 ft x 100 ft lot you will get two 50 ft x 100 ft lots that are completely separate entities from each other.

    The first question you should be asking yourself is about the neighbourhood you are looking to complete the lot severance. If every property that is on the street in question has the exact or very similarly-sized lots you will have very little chance at severing any lot. The ideal neighbourhood and/or street is one with properties of varying lot frontage widths (a couple of 60 ft wide lots, some 25 ft wide lots, some 50 ft wide lots, etc.) so that you can fulfill the minimum requirement of lot width that the area has set-up.

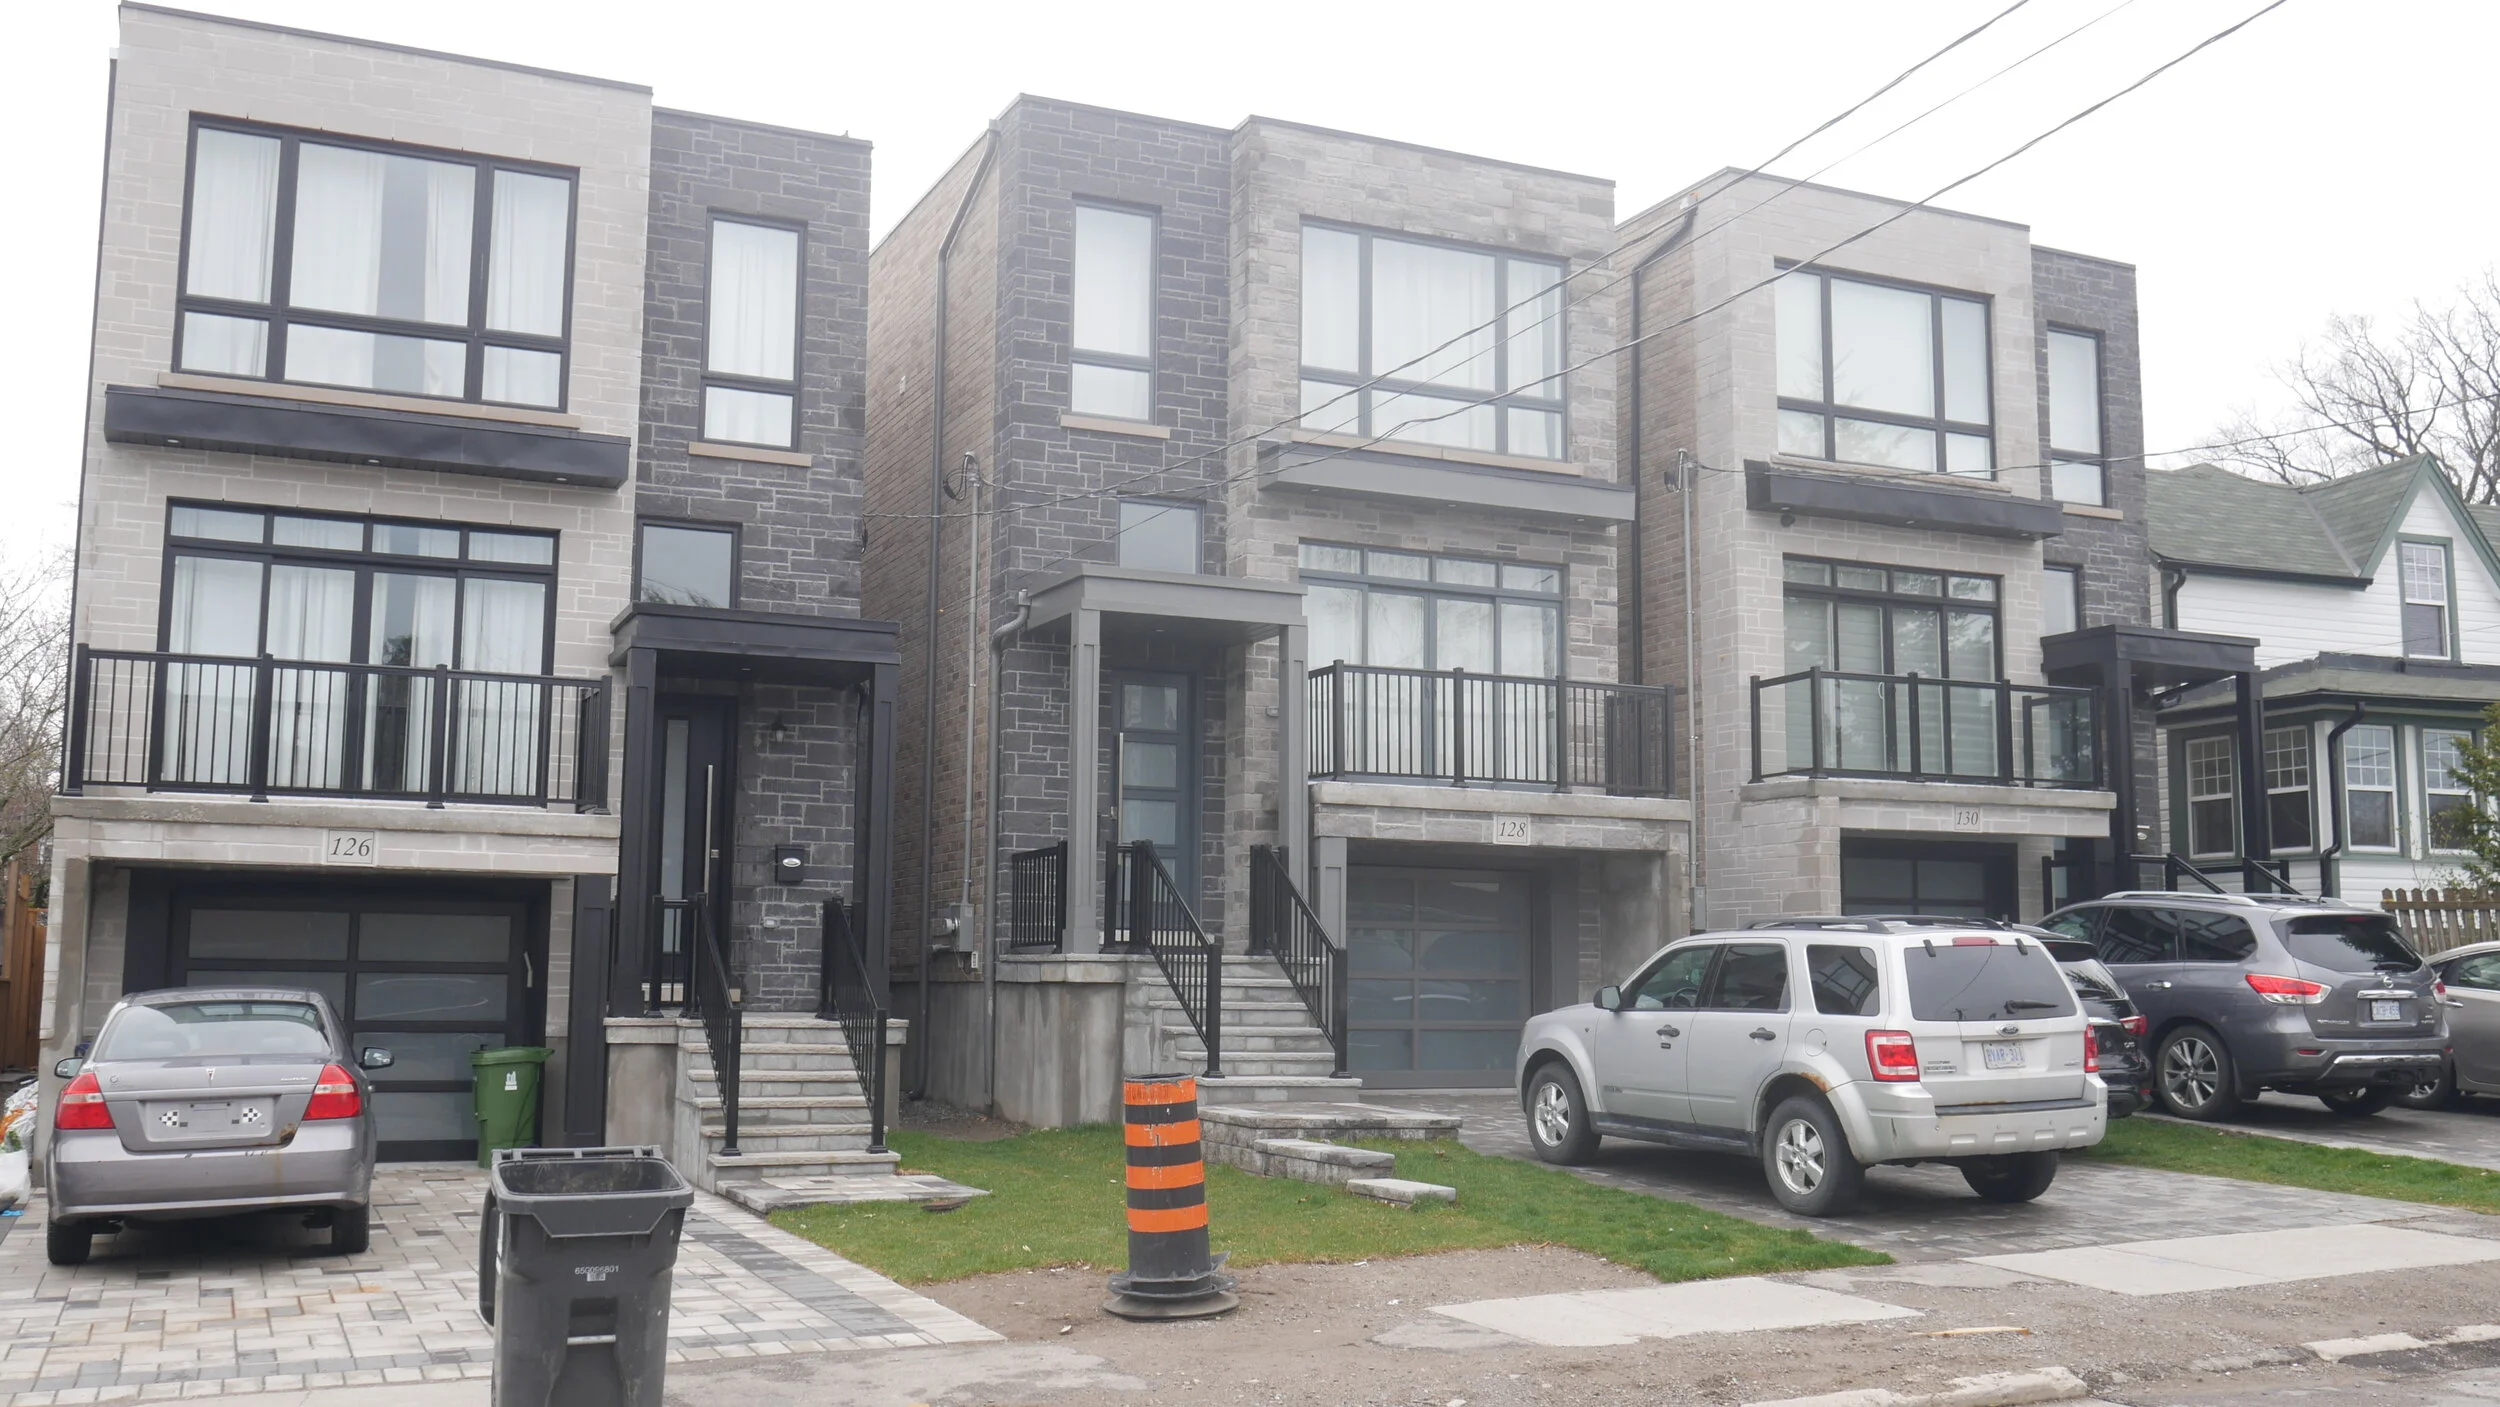
    For example, if you have a 50 ft wide lot and you live beside a lot that is 25 ft, you will likely be able to sever your lot because that 25 ft lot sets the minimum precedence with respect. See below of an example neighbourhood with varying lot sizes.

    Another exercise you can try is going into the Toronto Zoning Maps to find out what the minimum lot width is for the ward that your property resides in. This will give you a more definitive outlook on what would be possible for your property. Further than this it is recommended to reach out to a planning consultant to help you determine if there have been any successful variances for severing properties into separate lots under the minimum lot width requirements in your neighbourhood. We can help you get in contact with the right team to do so, just fill out our form below!

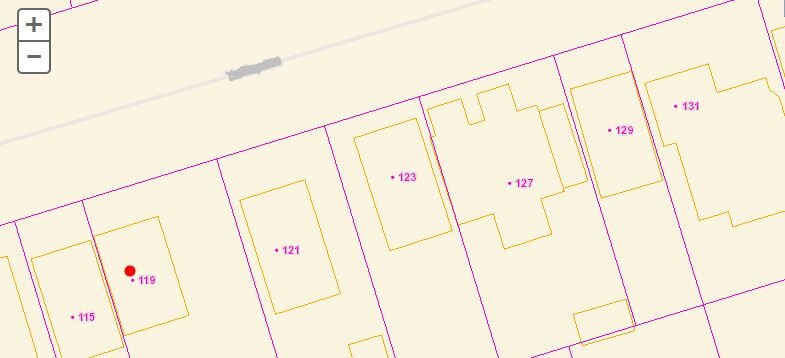
    Exercise: Find the potentially sever-able property (or properties)

    Take a look at the below picture of a neighbourhood with varying-sized lots. Can you figure out which properties are setting the minimum precedence and which one(s) might be eligible?

    BVM Contracting has developed a procedure with third-party planning groups to identify if residential properties and lots can be severed in Toronto. Please fill out the form below to determine if your property is eligible to be severed.

    BVM Contracting has specialized in lot severance services and can guide you through your journey of completing one. Below is a high level overview of how to complete a lot severance so that you can understand the requirements and potential costs:

    1. Partner with a Home Builder that can help you evaluate a property of interest, whether that be your primary residence or an investment property.

    2. Determine if a property of interest is able to be severed. BVM Contracting will be able to refer you to our referral planning consultant to help complete this due diligence step

    3. Get a fee proposal for the design and disbursements (permits, development costs, etc.). The design is relatively inexpensive in comparison to the development fees, and we would be able to nail these costs down early on in the process. A rough magnitude budget for severing one lot into two lots is around $100 000 (plus or minus, but serves as a good magnitude to work from), inclusive of development fees.

    4. Once you have a fee proposal and have the property of interest that you want to build on, you can start the process of getting the design started, and also getting some solid numbers together for the construction budget. BVM Contracting is able to create very accurate budgets based on square footage, exterior/interior finishes, and other high level information to create a budget for the project. Once the preliminary design is created we would be able to solidify pricing from beginning to end.

    5. Once you have the soft (design/development fees) and hard (construction) costs for the build, this is the time to reach out to a financing firm, investors, and mortgage specialist to fund the project. Fortunately, we have a network of all three of these groups of people that would be able to help you afford your project.

    6. Once you have the financing in place and the permits/development proposal is approved by the City of Toronto you can now build the new homes!

    With our design-build approach and network of financing options we can help any home owner sever their lot if it qualifies. If you have equity built up in your home that will make the process even more smooth. We have completed severance projects for home owners where:

    • They move into the one property and sell the other to recover the costs from the build and repay financing and investors. You are essentially building a new home for nothing!

    • They build the new homes and sell both at a profit

    • They get the properties severed, get the development fees paid then sell the lot for land value and development potential.

    If you are interested in severing your lot and need a place to start, look no further than contacting BVM Contracting!

    About BVM COntracting

    BVM Contracting is a full-service General Contractor or Home Builder located in Toronto. We provide home renovation and building services for major home renovations (kitchen renovations, bathroom renovations, basement renovations, full interior renovations, home additions, lot severances, and new home construction). Our goal is to help guide our clients through the process of renovating their home, from concept to completion.

    Further than providing General Contracting and Project Management for major home renovations, we also offer value-added services such as renovation financing, renovation rebate consultations and services, building permit and design services, smart home installation services, and real estate investor services.

    To learn more about our offering by visiting our services page.
  • Toronto Laneway Suites

    Toronto Laneway Suites

    Laneway Suites

    Toronto, Ontario

    What is a laneway suite? Where can you build a laneway suite in Toronto? Is my property eligible to build a laneway suite? What incentives are there to build a laneway suite? How do you build a laneway suite? And what is the approximate cost to build a laneway suite? BVM Contracting is here to answer all of these questions in this blog!

    As of August 2018, the City of Toronto has allowed the construction of laneway suites in Toronto. This is an exciting new plan to help increase the number of available housing stock in the City and try to make the City of Toronto more accessible and affordable. Learn how you can take advantage of your laneway’s untapped income potential and create a second unit/secondary suite on your property.

    What is A LANEWAY SUITE?

    A laneway suite is a self-contained living accommodation for a person or persons living together as a separate single housekeeping unit, in which both food preparation and sanitary facilities are provided for the exclusive use of the occupants of the suite, in a detached building that is ancillary to a residential building on the same lot, and is located in the rear yard abutting a public lane. Laneway housing is considered to be a second unit/secondary suite.

    WHERE CAN YOU BUILD A LANEWAY SUITE in Toronto?

    Further than the obvious answer of “in a laneway”?

    Initially, laneway suites were constrained to the Toronto and East York Districts, as they were the most dense in laneway properties. Although, as of Summer 2019 the construction of laneway suites is allowed across the entire City of Toronto. The only restricted area in the city is bounded by Avenue Road, the Canadian Pacific (CP) Limited rail corridor, Yonge Street, Rosedale Valley Road, Sherbourne Street, Bloor Street East and Bloor Street West.

    What are the Design Requirements for Laneway Suites?

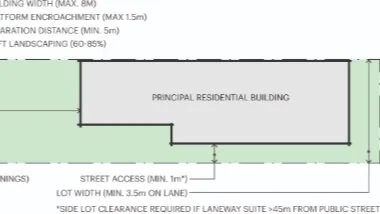
    To keep it really simple the following image shows the major design requirements for being able to build a laneway suite on your property.

    The key aspects of the design to make note of are are the requirements for setbacks from property lines, separation from the principal residence, and soft landscaping for the property. There are also specific guidelines for building height based on the size and layout of your existing dwelling, and restrictions on the shape (or even existence) of the second storey if the Laneway Suite is too close to the Principal Residential Building.

    There are certain aspects of the by-law that offers flexibility in design of the laneway suites, namely:

    • The floor area of Laneway Suites do not count against the total floor area allowed on the lot.

    • Laneway Suites do not require a parking space for cars, although they do require a minimum of two bike parking spaces within the build-able footprint allowed by the setbacks (inside or outside the building). In addition to this, any lot containing a Laneway Suite does not require parking spaces at all. So, there’s no need to worry about getting into trouble if you give up a garage parking space to create a suite.

    BVM Contracting will be able to complete an on-site evaluation of your property to determine if it qualifies for the construction of laneway housing! Contact us to set-up a meeting!

    Incentive Programs for The Construction of Laneway Suites

    1) Development Charges (DC) Deferral Program for Ancillary Secondary Dwelling Units

    Since the development charges in the City of Toronto are not cheap, the City of Toronto was able to create a deferral program that allows homeowners building an ancillary secondary unit (AKA a laneway suite) to defer the development cost of the laneway suite, as long as the suite remains apart of the property and is not severed into a new property within 20 years of the issuance of the building permit.

    The DC Deferral Application can only be filled out (click here to open the form) after you apply for a building permit for the construction of a laneway suite. Additionally, if you intend to apply for this program, please do not pay your development charges as the City will not be able to credit back the fee.

    To learn more about who can apply and how to apply reach out to a BVM Contracting Renovation Consultant to start the conversation!

    2) Affordable Laneway Suites Program

    The Affordable Laneway Suites Pilot Program provides funding in form of a forgivable loan of up to $50,000 for eligible property owners developing a laneway suite. The loan will be forgiven in 15 years from the date when the first tenant occupies the laneway suite. A forgivable loan is essentially a loan that is voided if all of the terms of a particular agreement are satisfied. In this particular scenario, the rent being charged cannot exceed the City of Toronto Average Market Rent, by bedroom type at any time during the 15 year affordability period, as reported annually by Canada Mortgage and Housing Corporation (CMHC). Make sure that you understand the implications of charging average market rent, as it may lead to less rental income and also constrain you to only renting to long-term tenants.

    It is important to note that, just like the DC Deferral Program, you will need to have applied for a building permit before filling out the form (which can be found here). You will also need to be approved for the DC Deferral Program, so ensure that you fill out the DC Deferral Application form as soon as possible after you apply for your building permit!

    To learn more about if the affordable laneway suites program works for you reach out to a BVM Contracting Renovation Consultant to start the conversation!

    The Process of Building a Laneway Suite with BVM Contracting

    Once you have your building permits completed and approved for the project, the following process will be taken to build the laneway suite.

    • Demolition/Excavation: Before the process of building the laneway suite is started, the existing structure needs to be demolished. BVM Contracting will be able to efficiently demolish your existing structure and remove the debris using our in-house disposal services. The excavation will also be completed for the location of the laneway suite and a trench will be run in between the primary residence to the laneway suite to run the infrastructure out to the new secondary laneway suite.

    • Utility Infrastructure Run-outs: Once the slate is blank, this is the time to run all of the underground infrastructure to the location where the laneway suite is being constructed. More often than not the underground infrastructure (drains, plumbing, and natural gas) will need to be trenched from within your home out to the laneway suite. BVM Contracting will determine the location of all of the infrastructure on the property to determine the most cost effective way to run everything out to the laneway suite.

    Note about electrical: You have the choice to install a separate meter or use your primary residence’s existing infrastructure to run the electrical out to the laneway suite.

    • Foundation Creation: The building permits outline the type of foundation needed to support the load of the new laneway suite. BVM Contracting will ensure that the concrete work is completed quickly and efficiently to minimize the effect on laneway access to your fellow laneway-using neighbours. The foundation will be poured and underground infrastructure will be brought in once the foundation work is completed.

    • Rough Framing: Using our warehouse conveniently located in the City of Toronto, we are able to build the structure of the laneway offsite to minimize the disturbance in the laneway and the amount of framing material stocked on site. We then transport the components of the laneway structure to your property to be assembled within 2-3 days depending on the size and complexity of the structural detail for the home.

    • Roofing, Windows/Doors, and Exterior Finish: To enclose the structure and make it weather-resistant, the roofing is completed, windows/doors are installed, and exterior finish is installed. The exterior windows/doors and finish are then sealed to allow for a water-resistant finish.

    • Rough-in Work (electrical, plumbing, and HVAC): Usually as the exterior is being finished the interior of the laneway home or suite is being roughed-in for electrical/HVAC/plumbing. All plumbing supply lines and drains (for toilets, sinks, showers, bath tubs, hot water tank, etc.), electrical wiring (for potlights, ceiling lights, kitchen lighting, exterior lights, receptacles, baseboard heating etc.), and HVAC lines (for heat pumps, air conditioner, gas lines, etc.) are installed so that they can be insulated and dry-walled over.

    • Insulation & Drywall: Once the plumbing, HVAC, and electrical inspections are passed, it is now on to insulating the home. Ensure that the walls and attic are well insulated, and if you have a garage under the laneway suite ensure that the floor joists are insulated as well. If you are using both levels for livable space, it is recommended to insulate the concrete slab before installing flooring. You could even consider hydronic heating on the main level to help heat the entire suite.

    • Flooring Installation: Hardwood (solid or engineered), vinyl, tile, or laminate flooring will be installed based on the client’s specifications.

    • Finish Carpentry & Stairs: Once the insulation and drywall work is completed, it is time to complete the finish carpentry work (baseboard, shoemould, casing for windows and doors, hanging the interior doors, etc.) and installation of the stairs.

    • Finishes: This is the last step and usually includes the following items:

      • Painting

      • Vanity install

      • Toilet install

      • Faucet/Tap install

      • Kitchen cabinet and counter top install

      • Staining

      • Light fixture install

      • HVAC fixture install (supply and return vents)

    The Cost to Build a Laneway Suite in Toronto

    The cost to build a laneway suite will vary depending on the following variables:

    • Laneway access

    • The location of infrastructure on the property (electrical service, sewers, drains, plumbing, and natural gas).

    • The proposed square footage of the laneway suite.

    • Access to primary residence infrastructure (to provide connection to electrical, sewers, drains, plumbing, and natural gas).

    • Exterior finishes (vinyl siding v.s. stucco v.s. Maibec v.s….)

    • Interior finishes (IKEA v.s. custom cabinets, vinyl versus hardwood, etc.)

    It is safe to assume though that the cost to build and finish a laneway suite will be anywhere from $300 000-$600 000. Let BVM Contracting visit your property to determine if your property qualifies and what the approximate cost will be based on the above variables.

    It is important to note that laneway suites will also increase the value of your property, since secondary suites provide extra income to the property that can be used to subsidize a future buyer’s mortgage.

    Conclusion

    Laneway suites will be a very popular and potentially lucrative investment opportunity for any home owner that owns a property with an eligible laneway property. Let BVM Contracting, an experienced new home builder in Toronto, help you evaluate the return on investment and competitively budget your project so that you know the exact cost to build a laneway suite on your property.

    Contact us to speak with an experienced residential renovation company and get your laneway home build experience started! We will be able to walk you through the process of completing the project, from concept to completion.

    About BVM COntracting

    BVM Contracting is a full-service General Contractor or Home Builder located in Toronto. We provide home renovation and building services for major home renovations (kitchen renovations, bathroom renovations, basement renovations, full interior renovations, home additions, and new home construction). Our goal is to help guide our clients through the process of renovating their home, from concept to completion.

    Further than providing General Contracting and Project Management for major home renovations, we also offer value-added services such as renovation financing, renovation rebate consultations and services, building permit and design services, smart home installation services, and real estate investor services.

    To learn more about our offering by visiting our services page.
  • Toronto Epoxy Floor Installation

    Toronto Epoxy Floor Installation

    How to Install Epoxy Flooring in Your Home

    BVM Contracting has successfully installed epoxy flooring for many custom home projects in Toronto, and has an outline below that will answer the following questions:

    1. What is epoxy flooring?

    2. Advantages of Epoxy Flooring

    3. Epoxy flooring Installation process

    4. Step by step Epoxy flooring installation process

    5. What is the cost to install epoxy flooring?

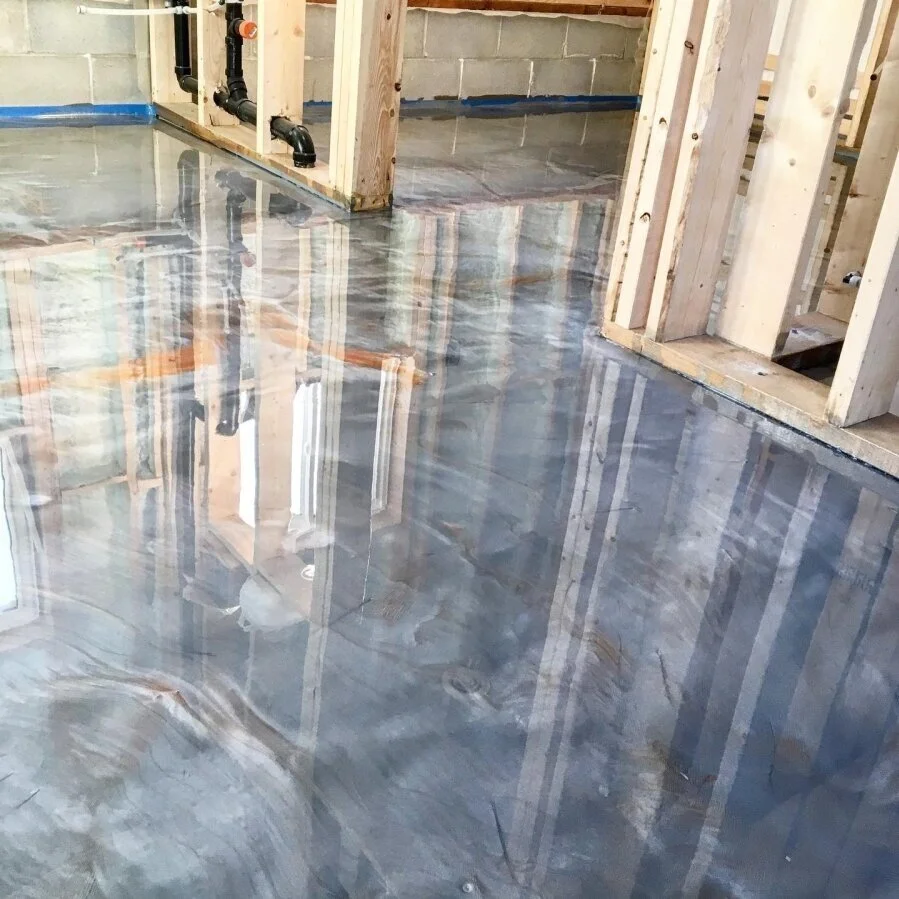
    Epoxy Flooring, otherwise known as resinous flooring, is highly durable, customizable, sustainable, and decorative floor finish for any surface. Epoxy is a highly resistant flooring, and can withstand to high levels of wear and tear. This makes epoxy one of the most long-lasting flooring options.

    Epoxy flooring is most widely applied to concrete surfaces, which makes them great candidates for application in new home construction and home addition projects. Usually epoxy flooring is installed in basements, garages, and outdoor landscaping areas like porches and patios.

    • Can increase brightness in the area with a high-gloss finish

    • Resists oil stains and water

    • Can create anti-slip surface with additive

    • Prevents wear and tear of existing concrete floors

    • It is a durable surface that can withstand a lot of traffic and wear and tear

    • Requires little to no maintenance

    BVM Contracting has completed many epoxy floor installations in the past, and have created a video that goes over the process of installation. In the video we have our new custom home build basement at Phyllis Avenue finished with epoxy flooring.

    Step 1: Floor Grinding, Surface Preparation, and Repair

    In order for the epoxy to adhere properly to the floor it needs to be clean and porous. If the concrete floor has cracks or any chips they need to be repaired.

    It is important to confirm that the floor has not been previously sealed to make sure the epoxy adheres properly. Test this by pouring water on the floor, if it doesn’t soak in and beads together it is likely that a sealant has been used. If this is the case the floor may not be a suitable candidate for epoxy floors.

    It is also important to ensure that the temperature of the floor is suitable as per the manufacturer’s guidelines. Your General Contractor will be able to help with this!

    Step 2: Installation of Coloured Epoxy Primer Coat and Finished Appearance

    Using a polyurethane system, a mixture of the resin/epoxy and the suitable pigment for the finish colour is used. The product is applied with a roller and/or squeegee to ensure the entire surface is covered by the primer.

    Once the primer is installed there are three different finish options:

    1. Decorative Flakes: Applied when the primer is still wet and the chips are applied directly into the base coat.

    2. Metallic Finish: Applied when the primer is still wet, the epoxy design that the client wants is poured. Any additional designs that the client wants is applied at this time as well.

    3. Industrial Sand Epoxy: Sand it added into the the primer and rolled in to achieve an even distribution. To achieve an even coat an additional coat is applied with more sand. This gives this type of epoxy floor a very durable and non-slip finish. This is also the final step in this flooring system, and step three is not needed.

    Step 3: Installation of Clear Top Coat: This is the final step where the floor is applied with a clear polyaspartic top coat. It is recommended that the top coat is left to cure for a minimum of 24 hours before any foot traffic.

    This is a question that we get asked a lot of customers and it depends on the type of finish, location of the epoxy flooring, if the floor is existing or new, and overall square footage of the area. For more information about pricing for your project please book a no obligation renovation consultation below!

    Book an ONLINE renovation consultation!

    Please book your online renovation consultation to start your renovation journey! Even though we are socially isolated for the near future doesn’t mean that we can’t start a conversation about your proposed home renovations. Now is a perfect time while we are at our homes to figure out what the next best plan is for home improvement. You can rely on BVM Contracting to guide you through the renovation and home building process, even if it has to be done online!

    We are looking forward to getting you started off in the right direction and learning about your project.

    About BVM COntracting

    BVM Contracting is a full-service General Contractor or Home Builder located in Toronto. We provide home renovation and building services for major home renovations (kitchen renovations, bathroom renovations, basement renovations, full interior renovations, home additions, and new home construction). Our goal is to help guide our clients through the process of renovating their home, from concept to completion.

    Further than providing General Contracting and Project Management for major home renovations, we also offer value-added services such as renovation financing, renovation rebate consultations and services, building permit and design services, smart home installation services, and real estate investor services.

    To learn more about our offering by visiting our services page.
  • Everything You Need To Know About Residential Hydronic Heating

    Everything You Need To Know About Residential Hydronic Heating

    Before You Decide To Invest In A Radiant/Hydronic System, Read This Article!

    Over the last 10 years radiant in-floor heating and hydronic heating has exploded as a must-have heating source for any new home build, home addition, or luxury home renovation project. BVM Contracting has seen first-hand how these systems operate and what the best practices are for installing a radiant in-floor heating system.

    This article aims to enlighten home owners about what radiant in-floor (otherwise known as hydronic) heating is, the different options of radiant/hydronic heating, where it can be installed, and how to install it properly.

    1. What is Radiant in-floor heating? (including components)

    2. Where can I install radiant in-floor heating In my home?

      3. How is radiant in-floor heating installed?

      4. How is a radiant floor heated?

      5. What Are the different products that I can use to create a radiant in-floor heating system?

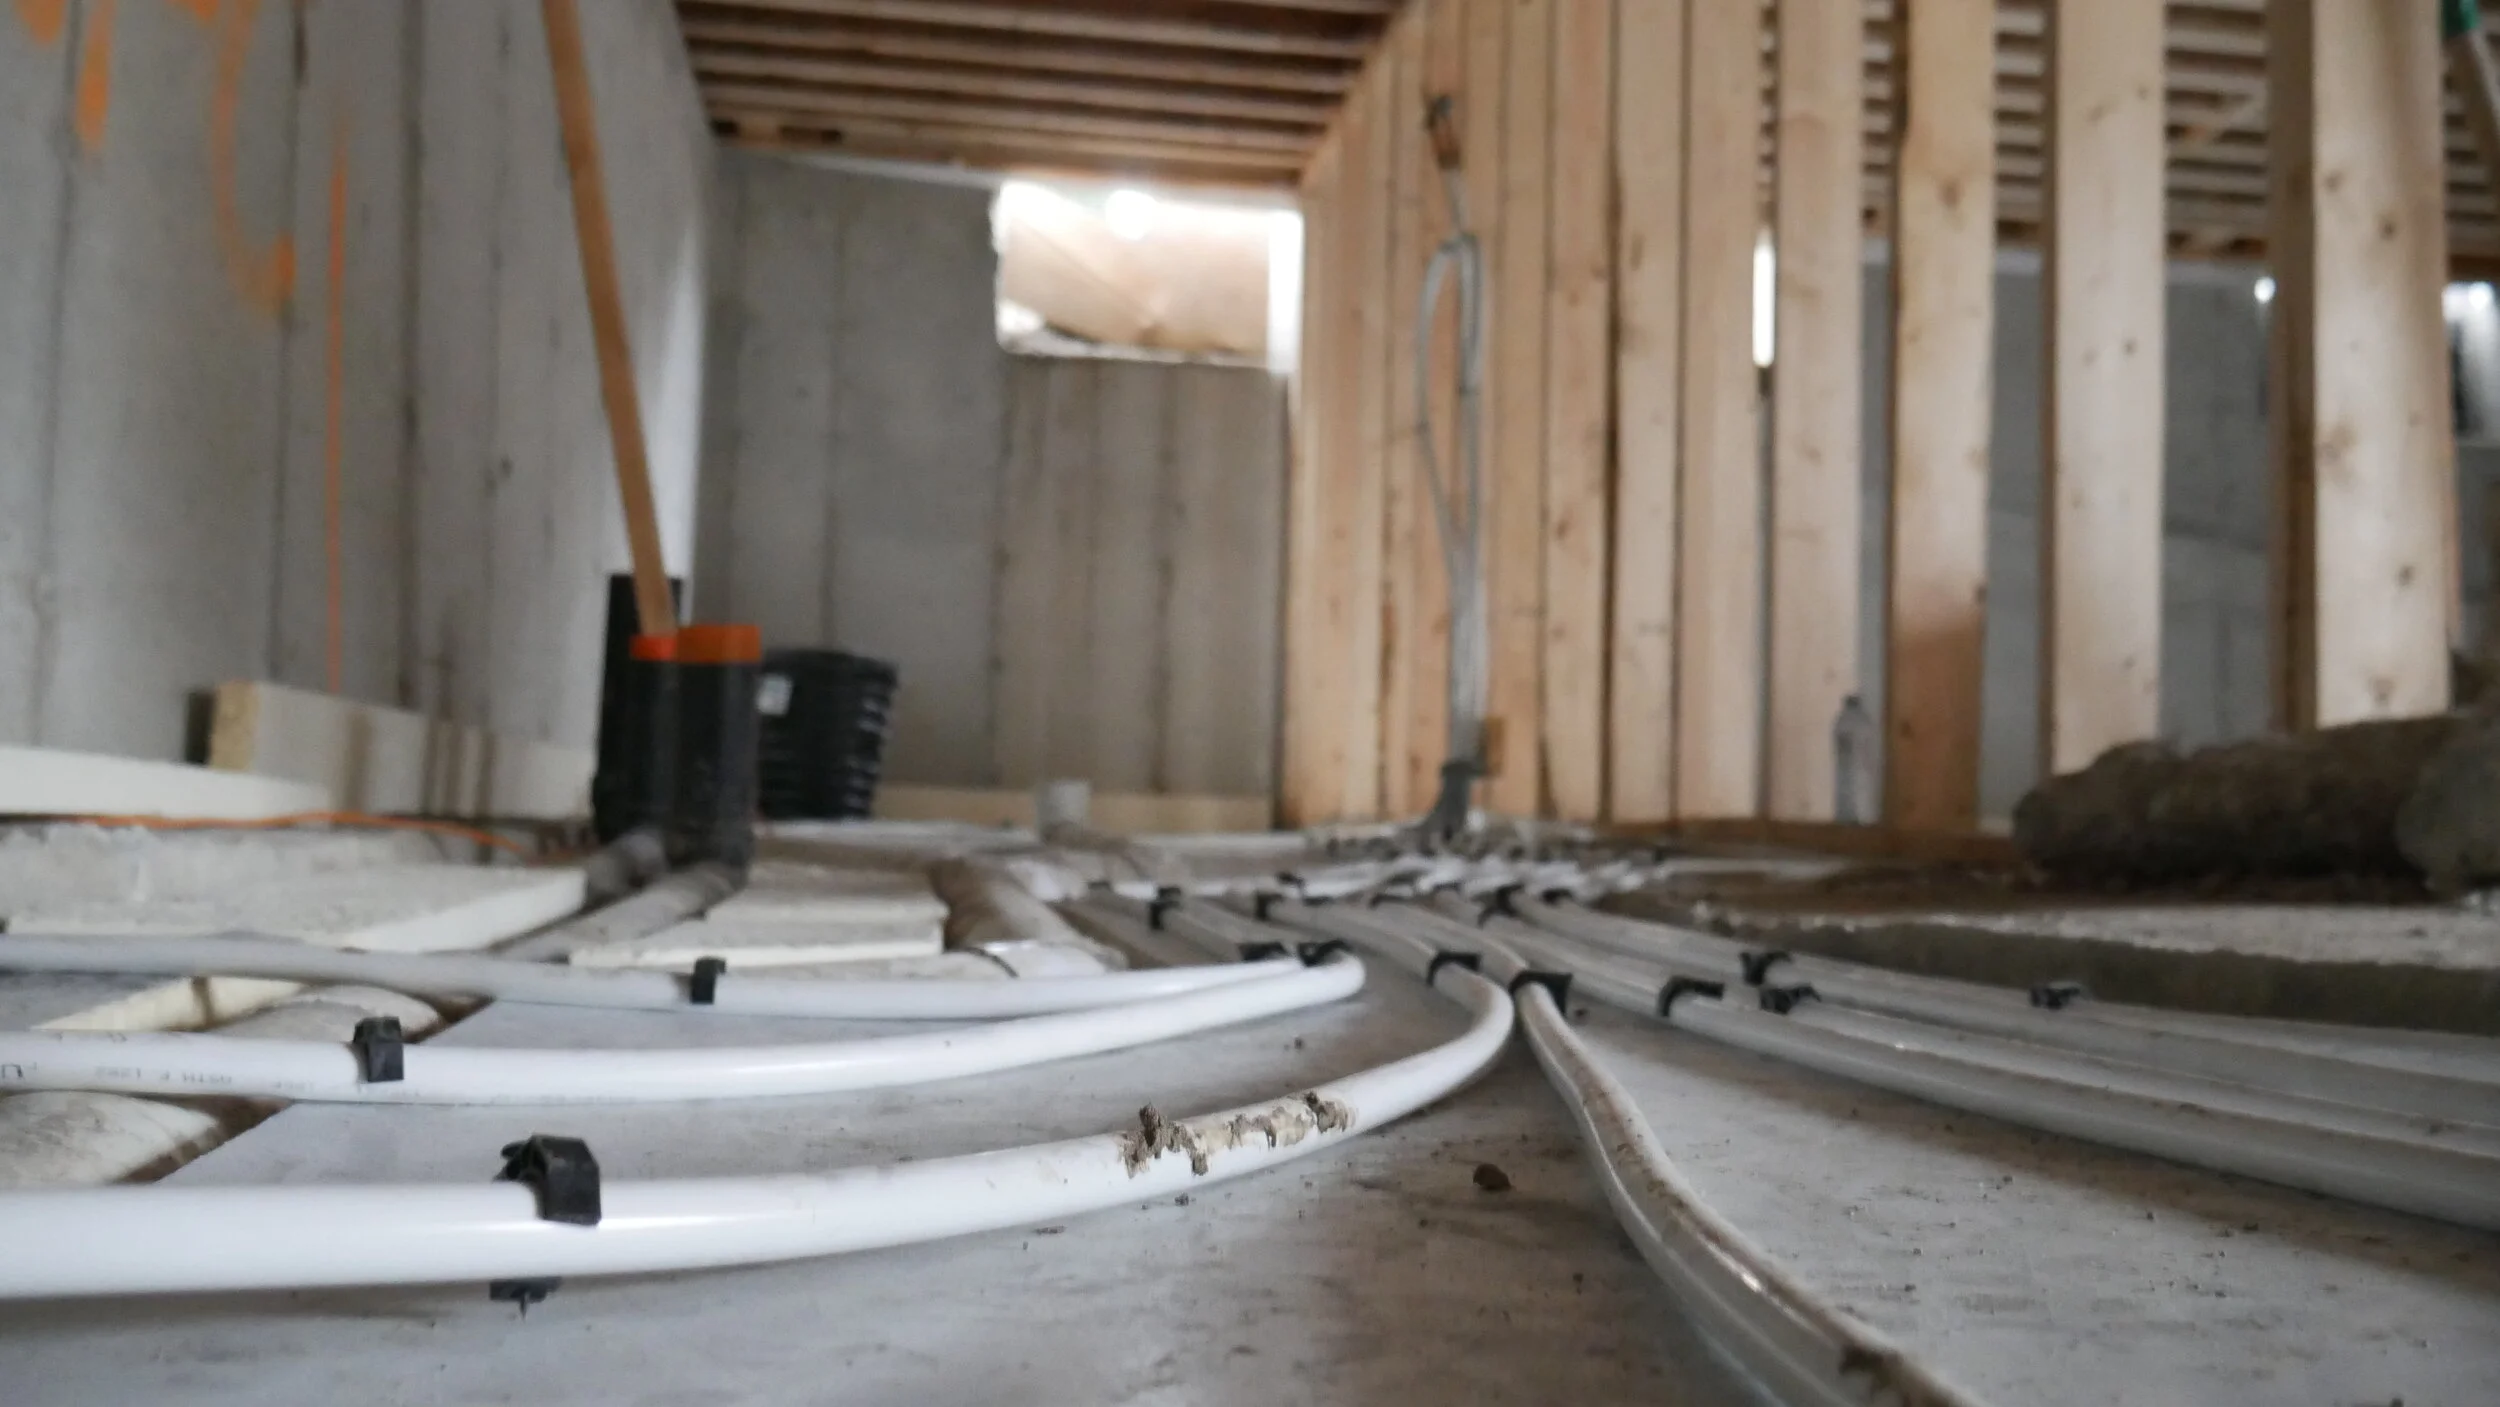
    Radiant in-floor heating is best described as a heating solution that uses a heat transfer medium (such as water or a water glycol mixture) to transfer heat from its enclosed tubing (PEX) to various areas and surfaces of your home and property.

    The process of heating involves the use of a boiler to provide the heating input to the system, and the heat transfer fluid is controlled by a system of pumps, actuators, and thermostats to make sure that the various areas of the house are being maintained at the desired temperature.

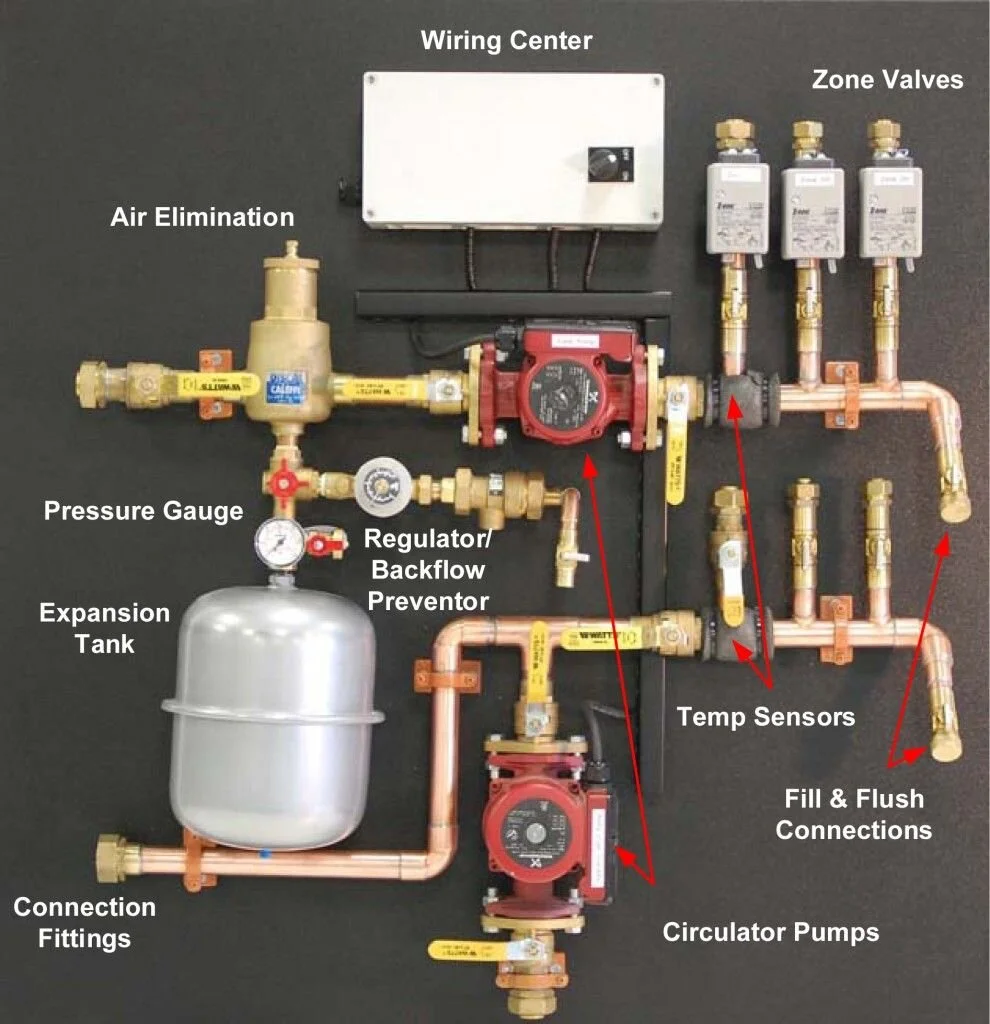
    The picture shown outlines what components are needed in the process of creating a Hydronic/Radiant Heating system.

     Hydronic Heating Components (not including boiler)
    Hydronic Heating Components (not including boiler)

    There are a wide range of applications for hydronic heating, which includes (but is not limited to:

    • Basement floors

    • Above grade floors (main/second floors)

    • Baseboard heaters (i.e. Stelrad hydronic heaters)

    • Towel warmers (pretty slick!)

    • Exterior snow melt systems (driveways, walk-outs, porches, etc.)

    • Indirect storage tanks (heated by boiler heat instead of gas or electricity, very efficient)

    • Forced air heating (a radiant heat exchanger built into air handler to provide heating for forced air systems)

    Basically, if you install a boiler you can run the entirety of your heating applications through it. If the boiler is efficient/condensing and uses natural gas you have yourself a very efficient heating system!

    For the sake of keeping this article short we will dive deeper into the in-floor heating portion of hydronic heating, which will encompass the basement/above-grade/snowmelt systems. These are some of the more popular (and luxury) hydronic solutions so they are worth discussing further!

    If you would like to learn more about the other options mentioned feel free to contact us to discuss further!

    Radiant or Hydronic heating is installed very similarly in each of these areas, with only minor differences:

    • Basements require an R10 (minimum) insulation layer for underslab application. A Expanded Polystyrene (EPS) insulation layer with PEX attachments is usually installed to create this layer so the heat travels up instead of sinking into the ground.

      • Note that radiant in-floor heating is possible for overslab applications in homes where the basement slab is not being removed. There are low-profile panels that can be used to help maintain the height of the basement, but allow you to install the system properly and get some insulation value below the hydronic system.

    • For the snowmelt system, this is installed with larger PEX piping and is a mixture of glycol and water to prevent freezing in the system. A snowmelt system requires a higher heating output from the boiler so the boiler will have to be designed properly by your HVAC designer in order to keep up with demand inside AND outside of the house. You will also want to install insulation for this system.

    • For above grade floors, you do not require any insulation beneath (but is still recommended for maximum efficiency). You also usually need to complete what we call an overpour to allow the radiant pex piping to sit underneath a layer of concrete. This is done to prevent the PEX piping from being punctured or compressed so that a flooring layer can be installed properly. There is actually a way around doing the costly overpour with a new technology by a company called Warmboard (which is explained below).

    In all three systems, you will require a layer of a medium with compressible strength (i.e. concrete) to protect the PEX. Each of these systems will also require a specific type of PEX with an oxygen barrier to prevent the accumulation of oxygen in the circulating loop (water = corrosion).

    As eluded to above the best way to heat a hydronic or radiant system is through the use of a boiler system. There are three main options in this department depending on where the hydronic systems are installed:

    • Combination (combi) boiler with multiple outputs (to use for hydronic and domestic hot water)

    • Traditional boiler (usually used with indirect hot water tank)

    The combination boiler route is usually a little less expensive, but will not be able to meet the demand when you are using hydronics for higher BTU output loops like snow melt or whole home hydronic heating. It is best to consult an HVAC design before setting budget numbers for this set-up.

    There are a myriad of different products for different applications for in-floor and snow melt systems. To keep things simple I will outline the products by component to better outline the options:

    Insulated PEX panels

    • Hot Rocks Panels

    • Isorad V2 Insulating Panels

    • Ampex (by Amvic)

    Above-grade panel solutions

    • Warmboard-S

    • Ecowarm Radiant Board

    These solutions will reduce the need for costly concrete overpours.

    Boiler Brands

    • Worcester Bosch

    • Veissmann

    • Rheem

    • Navien

    No matter what brand and system (combi versus traditional) you end up with, make sure that it is a condensing, high-efficiency boiler system. Depending on the fuel input you might also want to consider a wall-mounted unit!

    About BVM COntracting

    BVM Contracting is a full-service General Contractor or Home Builder located in Toronto. We provide home renovation and building services for major home renovations (kitchen renovations, bathroom renovations, basement renovations, full interior renovations, home additions, lot severances, and new home construction). Our goal is to help guide our clients through the process of renovating their home, from concept to completion.

    Further than providing General Contracting and Project Management for major home renovations, we also offer value-added services such as renovation financing, renovation rebate consultations and services, building permit and design services, smart home installation services, and real estate investor services.

    To learn more about our offering by visiting our services page.
  • Use 50 % Less Water with Nebia Shower Fixtures

    Use 50 % Less Water with Nebia Shower Fixtures

    Use Less Water and Modernize Your Shower Experience with Nebia by Moen

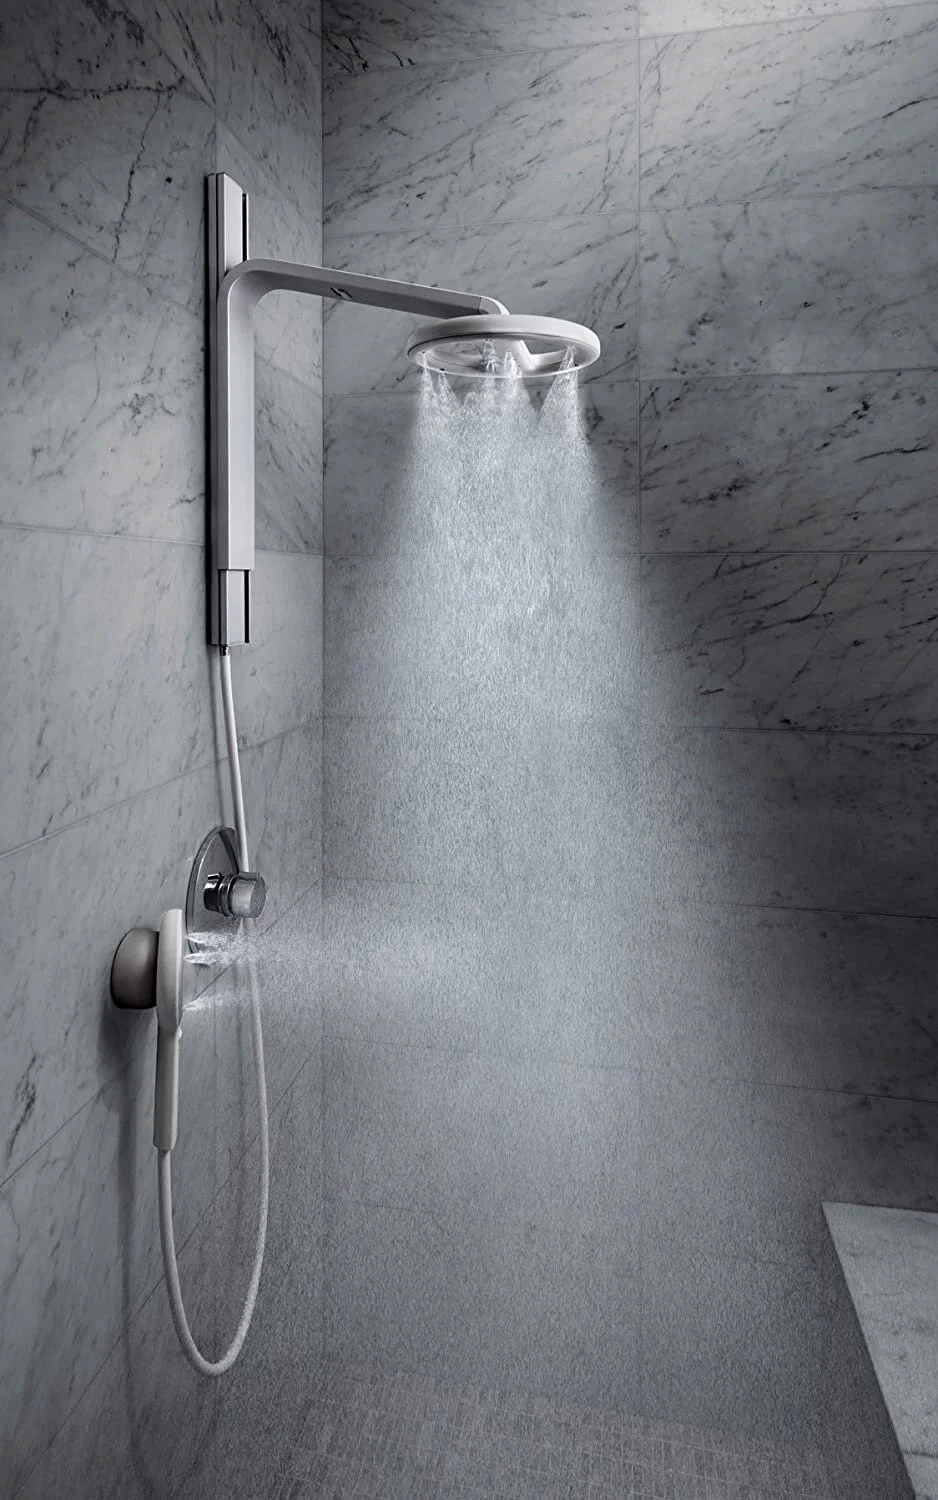
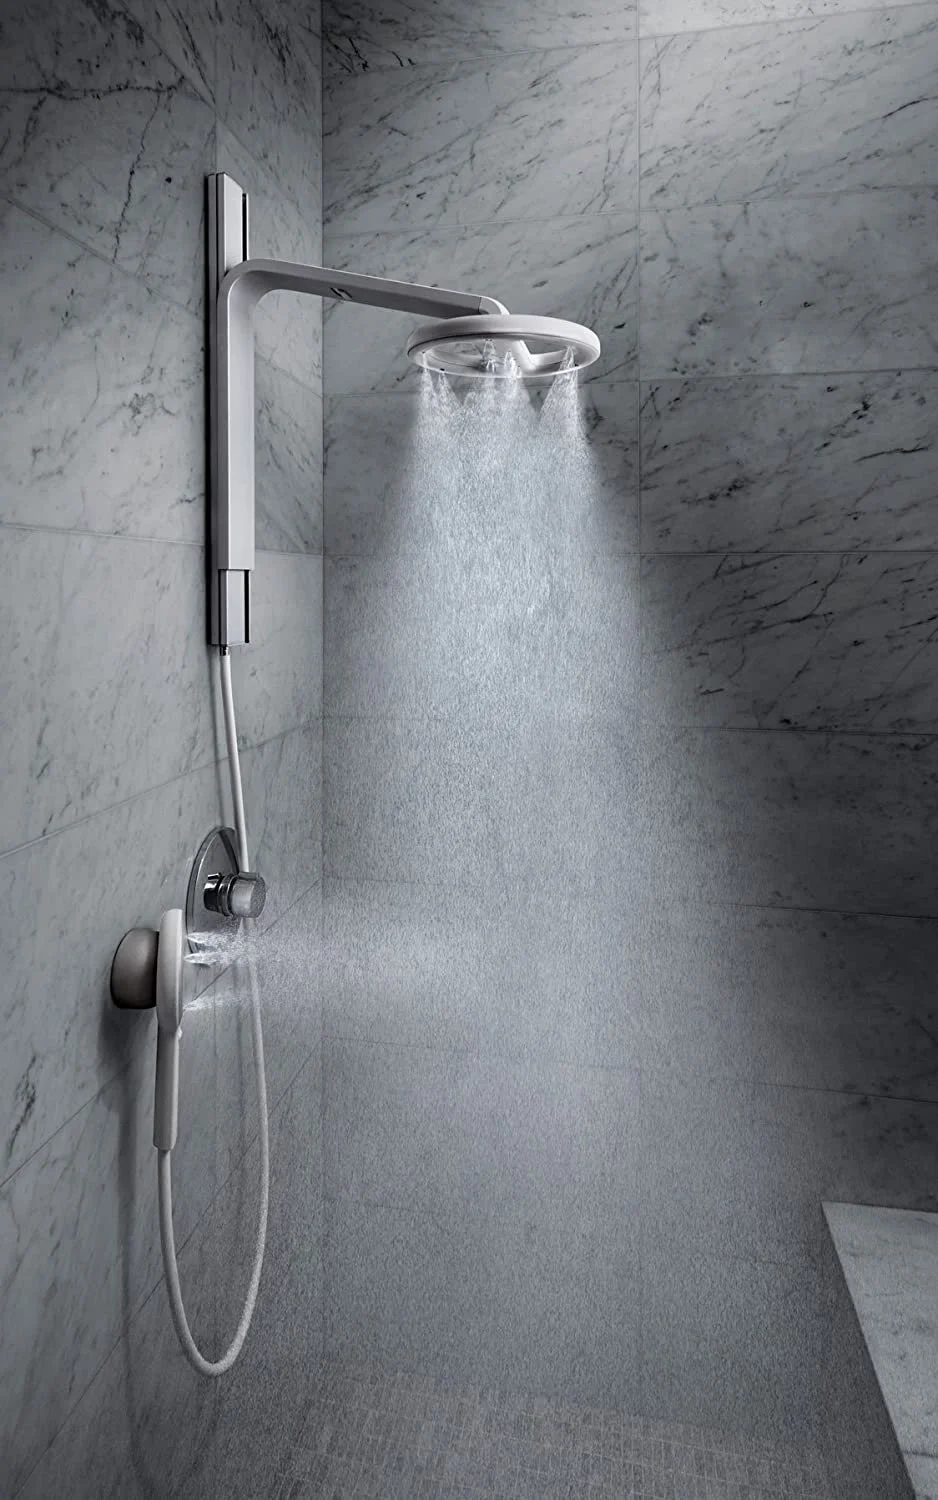
    When we see technology that we our customers will value and consider in their home building journey we HAVE to do a write up about it. In this article we discuss a very interesting piece of technology that Moen has created called Nebia. Nebia is an ultra-modern shower fixture that uses less water, is very customizable to suit your taste, and we think should be in your master bedroom ensuite as your next spa shower fixture!

    Read below to learn more about the Nebia shower system!

    Features of the Nebia Shower System

    • The technology surrounding Nebia is the fixture’s unique spray technology which allows it to turn the supply water into millions of small water droplets. These smaller droplets being sprayed allow for more coverage than standard fixtures. This fixture uses about 65% less water compared to a 2.5 Gallon per Minute fixture

    • Adjustable vertical sliding system for differing height and body coverage. The main shower head also tilts and swivels for optimum orientation!

    • Included hand showering system (as seen above), connected with a kink-free hose

    • Four different styles/colours to choose from, Black and Chrome, Brished Nickel, Chrome, and Matte Black!

    • This system is very easy to install

    Things to Consider Before Buying

    While doing some research about this shower fixture I pulled some interesting thoughts that you will want to consider before investing in this system:

    • Note that when you atomize water droplets the tendancy for these droplets will be to cool the surfaces that it touches, including you! That doesn’t mean that you won’t be able to feel warm in a Nebia shower, but if you are expecting a steaming hot shower this might not be the best option for you. After all it is marketed as a

    • The main head of the shower does not turn off when you use the hand showering system. If you are planning on washing your dog in this shower while being fully clothed then think again!

    • These systems work the best with a full shower enclosure so that the atomized water droplets stay in the shower as much as possible and keep the warmth in. Again, it won’t feel as warm as a normal shower but the full enclosure should help give you that nice warmth that people like when showering!

    • Since the water is being atomized the water hitting your skin will not feel the same as it would with a normal shower. Make sure you want more of the spa experience versus the standard shower experience before committing to this system

    Where Can I Buy the Nebia Shower Fixture?

    This fixture is widely accessible in the Canadian Marketplace. See the below list of notable companies that carry/sell this product:

    About BVM COntracting

    BVM Contracting is a full-service General Contractor or Home Builder located in Toronto. We provide home renovation and building services for major home renovations and custom home builds (full interior renovations, home additions, lot severances, new home construction, and laneway suites). Our goal is to help guide our clients through the process of building their home, from concept to completion.

    Further than providing General Contracting and Project Management for major home renovations, we also offer value-added services such as renovation financing, renovation rebate consultations and services, building permit and design services, smart home installation services, and real estate investor services.

    To learn more about our offering by visiting our services page.